How to Add Custom Navigation Menus in WordPress Themes?
WordPress is the platform where you can manage your website and make it look exactly the way you want only spending a couple of minutes. Likewise, creating the Custom Navigation Menus is somehow a cakewalk. However, adding well-organized menus to your WordPress website is crucial as the visitors find it easy to navigate your site. A navigation menu leads the visitors to land on the interesting content that they are looking for. Thus, if you really want to make your WordPress site smoother to navigate, create a custom navigation menu in themes and customize it accordingly. In the blog post, we’ll show you how you can effortlessly do this job in the quick possible time. Thus, stay tuned!
Navigation Menus is a collection of links that can easily be customizable in a WordPress theme. More often, they can fit anywhere you want to see them on your WordPress website. So, technically, a menu can be placed anywhere as per your demand. All you need to do is to make a clear and well-defined navigation menu and then frequently get them to go wherever you would like to be.
Why Create Custom Navigation Menus in WordPress Themes?
A number of benefits you can have when you create a Custom Menu In WordPress website. Let’s have a short glance at below:
- Visitors will find their path to reach out to your site content.
- A list of links added to your site will help users to get around your site.
- Flexibility to access important areas of your site.
- The Pageviews ratings will be high.
- The bounce rate will slightly go down.
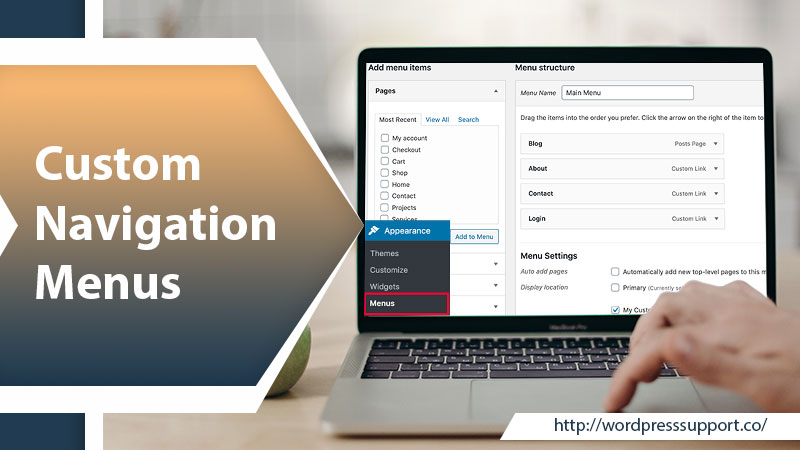
For visual representation, you may get help from the image.
Creating a Custom Navigation Menus is not something like rocket science, despite having the level of your expertise. The top-to-toe process of adding a menu to your WordPress website is easy and straightforward. Beneath, we’ll walk you through the three different ways in order to create a WordPress menu without any hassle. Thus, let’s just feast your eyes and implement the method according to your easiness and effectiveness.
Ways 1: WordPress Built-in Tool
WordPress has built-in functionality that helps you or your developers to generate a menu in WordPress Theme. Just because it is your business site, so, you might have complete compatibility with your WordPress website. Therefore, using a familiar interface and native tools you can build a custom menu. Here’re the required steps to do so:
- First and foremost, log in to your WordPress website.
- Now, from the left side of the WordPress Dashboard, head over to the tabs of “Appearance” > “Menus”
- After doing so, a new screen will pop up showing a couple of options. The options will be selecting a current menu and creating a new one.
- So, to build a new menu, simply, give an instant click on the “Create a new menu” link.
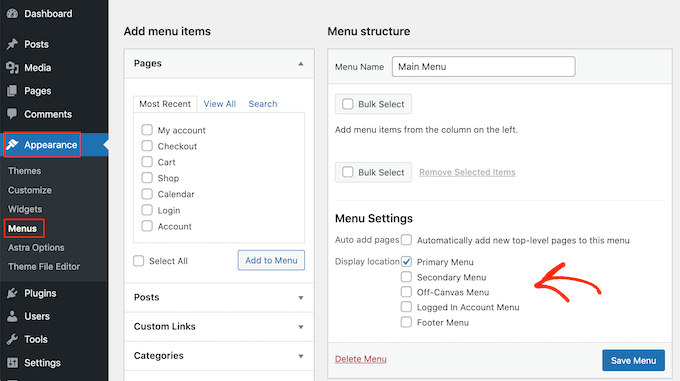
- Now, give it a name in the “Menu Name” text field and then check out the “Menu Settings” section.
- Several checkboxes appear beneath the “Menu Settings” section, but you don’t need to choose them all.
- Check the boxes “Automatically add new top-level pages to this menu” and “Desktop Horizontal Menu” to display the correct location of your menu.
- Now, click the “Create Menu” tab at the bottom right corner.
- Now, the page will refresh and show that you are in your recently created menu.
- After that, look at the left side of the screen. You will see the lists of all the posts, pages, taxonomies, and other linkable assets on your site.
- Now, build Custom Navigation Menus just by checking the boxes on the left and then clicking the “Add to Menu” button.
- Now, you can drag and drop menu items into the central section of the Menu screen. Furthermore, click the expansion arrow beside each item to set the label of your WordPress menu item or discard it.
- Now, after clicking the “Save Menu” button, you will be good to go.
Ways 2: Using A WordPress Plugin
There are numerous plugins for WordPress to aid you in quickly creating Custom Navigation Menus without complications. So, let’s take a prominent Max Mega Menu plugin to start building a navigation menu for your WordPress website. Here’s the complete procedure that you have to perform. Let’s follow:
- In the very beginning step, you need to install and activate the “Max Mega Menu” plugin in WordPress.
- Afterward, you will get to see a new “Mega Menu” panel on the left side of the WordPress Dashboard.
- Next, you need to head over to “Mega Menu” and select the “Menu Locations” option or any other customizable options that are listed.
- After successfully creating Navigation Menus and customizing them according to your requirement, click the “Save Changes” button.
Ways 3: Using Code To Build Custom Menu In WordPress
It is an advanced professional way to get the navigation menu created on your WordPress site. All you need is to be excellent in the code editor and have sharp skills. You can freely add a custom navigation menu in WordPress Theme using the code. The stepwise instructions are noted below, have a glance and go through each step appropriately:
Step 1: Register Your New Menu
The first thing you need to execute is to register a new custom menu. To do so, follow below:
Open the theme’s functions.php file
- Open the theme’s functions.php file
- Now, you need to register your new navigation menu.
- To do this, use the “register_nav_menus()” function.
- Write the following code in the php file:
function my_custom_menu() {
register_nav_menus(
array(
‘my-custom-menu’ => _( ‘My Custom Menu’ ),
‘my-custom-menu-2’ =>_(‘My Second Custom Menu’)
)
);
}
add_action( ‘init’, ‘my_custom_menu’ );
- This is how you can register multiple new Navigation menus for your WordPress website.
- Once done with coding, verify your “Custom Menu” is listed in the “Menu Settings” section.
- For that, go to the WordPress Dashboard.
- Navigate to “Appearance” > “Menus.”
- Finally, you will notice that your newly registered custom menu appears in the “Menu Settings” section.
Step 2: Display Custom Menu
Now, you need to display the newly created Custom Navigation Menus the way you want to see them on your WordPress website. For that, you are recommended to use the “wp_nav_menu()” code in the header file. Here’s how:
- First, you have to open the theme’s header.php file.
- Now, add the following code:
- wp_nav_menu( array( ‘theme_location’ => ‘header’ ) );
- You can add more custom menus by wrapping the code with an “if” statement.
Step 3: Add Content
You can even also insert content just before or after your menu items simply by using the “before” and “after” parameters. Try out the example given below to do so:
wp_nav_menu(
array(
‘menu’ => ‘primary’,
‘link_before’ => ”,
‘link_after’ => ”,
)
);
We hope, you probably understand how to create Custom Menu In WordPress. However, your WordPress Navigation Menus will keep your visitors to be on your site and hence lead it to get a high search rank. But, if none of the aforementioned guides has helped you learn the way to add a custom navigation menu in WordPress, don’t panic! We have the dedicated and highly qualified WordPress specialists to provide 24/7 Online WordPress Support. So, connect with us via the round-the-clock accessible chat with our professionals and get your navigation menu created and customized in a well-professional manner.
Tagged with: Custom Menu In WordPress custom navigation menus nevihation menus-
On Time Delivery
- 50
Discount
-
24×7 WordPress Support
-
Cost Effective Services
-
Skills Wordpress Developers
-
100% Satisfaction