
How To Backup Your WordPress Site Effortlessly?
Whether you run a business website or an online store, safeguard your site is extremely crucial. And, it could be possible only when you create a backup of your WordPress site on a regular basis. There are several astounding WordPress Backup Plugins that will direct you to Backup Your WordPress Site more conveniently. However, Backups give you peace of mind by preventing you from dreadful situations such as site hacking or losing data accidentally. In this tutorial, we will walk you through the step-by-step guide to make a full backup of your WordPress site. Thus, stay tuned till the end to learn how to backup your site for your WordPress-based business with ease.
Why Do You Need To Backup A WordPress Site?
Performing a Backup WordPress Site, either manually or using a backup plugin will save your precious time and headaches. Suppose you are experiencing a site-breaking error today and have no idea to get overcome this problem. So, in that scenario, if you have a comprehensive backup a day earlier or less, you will probably be fine. Furthermore, whenever the pages get corrupted or files are damaged, you can smoothly restore them within a pinch. Simply, reinstalling the backup will be the end of your work in terms of getting back your data. Therefore, a consistent backup of your WordPress site without any type of negotiation is highly necessary.
What Does WordPress Backup Comprise For Website?
Your WordPress site is generally made up of a couple of components. They are noted beneath:
- The first one is your website files i.e. theme/plugin files, scripts, media, etc. All these files are considered in making up the structure of your site and provide functionality.
- The second one is having a MySQL database of the WordPress site. The database stores your blog posts, comments, and the options that you have set in your WordPress admin area.
These two combined factors produce the entirety of your WordPress site along with high protection and security.
Fruitful Guidelines To Backup Your WordPress Site Effortlessly
It is always recommended you all take better care of your files as well as the database of your WordPress site. You can use the Best WordPress Backup Plugin to hassle-free backup your site time-to-time and secure your entire productive information. In the below section, we will show you how to Backup WordPress for your site without facing any complications. Thus, give a short glimpse of the following instructive guide.
Method 1: How To Backup WordPress Manually Via cPanel
Building a website is not your final job; however, keeping an up-to-date copy of your website is extensively important. Your site somehow can be a victim of attackers or probably some fundamental documents get the breakdown. So, in that case, if you have access to Backup Your WordPress Site, you can instantly restore the backup. Moreover, you will be able to recover your lost data and hence return your website to its normal state. If you have no idea how to start doing it, don’t worry! Let’s implement the below-noted course of action.
Before You Begin, Prepare to Backup:
- Create a folder on your computer Desktop.
- Now, rename the folder as either your or your’s client business name.
- Thereafter, carry the name along with the data of the backup.
- Under this folder, create two subfolders named “Database” and “Site Files.”
Now, you are ready to Back up WordPress Site. Let’s do it now executing the stepwise directives accurately.
Step 1: Export WordPress Website’s Database
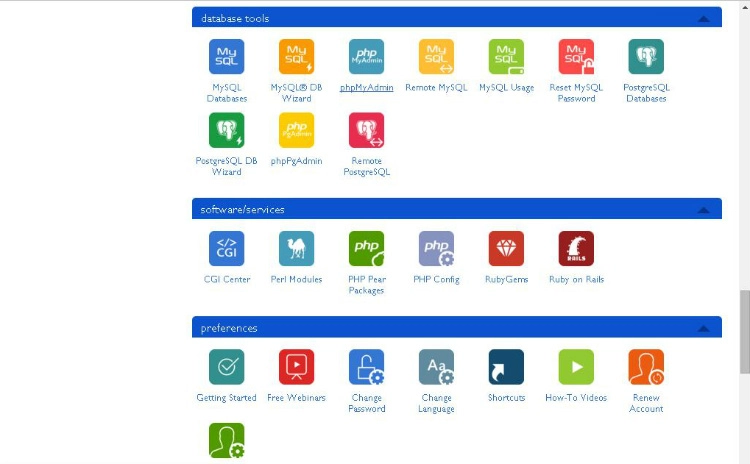
For manually backup, it is required to login to the server and export the core components, i.e. the site files and database. So, in this section, we will be using cPanel as the server reference. Here’s how:
- First, log in to the admin interface of your website’s cPanel using your correct login credentials. Or else, you can provide the information that is shared with you by your client.
- Now, once you are logged in to cPanel and landed on the Dashboard, click on the “DATABASES” drop-down menu.
- From the given list, select the “phpMyAdmin” option.
- After selecting it, the phpMyAdmin console will open in a new browser tab.
- Once you’re on the phpMyAdmin window, look on the left-hand side panel and select the database of your website. A list of websites that the server is hosting will appear. So, make sure you have selected the correct database.
- Now, give a single click on the “Export” tab located at the top.
- NOTE: In other servers, first, you need to slightly scroll down to the bottom of the list of tables. Then, click a checkbox behind the ‘Select All’ option. And then finally, tap the “Export” tab.
- When you are in the Export console, you will have three options in your hand. You can opt-out as per your choice like as:
- Select “Quick” as the Export method
- Select “SQL” as the Format option
- Click “Go.”
- Doing so, a file will automatically start downloading and further will save into the Downloads folder.
- Once the download gets finished, you will see a file saved with the suffix “.sql” on your computer.
- Further, you need to transfer this file to the subfolder named “Database”.
- Once done, great! You have successfully exported your website’s database.
Now, the next step is to export the site files. Let’s do it!
Step 2: Export Your WordPress Website’s Files
Here’s how to make use of cPanel in order to export your WordPress Website’s Files fluently:
- First of all, log in to cPanel, navigate to the dashboard, and select the “File Manager” option.
- Now, under File Manager, move to the right-hand column and search for the folder named ‘public_html’. Once you find it, give a single tap on it.
- Doing so, a pop-up will appear. Select “.Zip Archive” and then click “Compress File(s)”.
- Once the files have been compressed, click on the ‘public_html.zip’ folder.
- And then, tap the “Download” button.
- Once the download is finished, do not forget to delete the “.zip” file as it takes unnecessary space on your server. To delete the zip file, you first have to click on the “public_html.zip” folder and then finally tap “Delete”. Within a minute the file will be removed completely.
- Now, find out the .zip file and move it to the “Site Files” folder.
- Once you do it, great! You’ve successfully exported your WordPress site’s files.
Now, you’ve finally backed up your WordPress website’s database and its files as well. You can sleep well now as you know that you’ve safeguarded yourself and your client’s website.
Method 2: How To Backup WordPress Site Using Plugins
UpdraftPlus and BackupBuddy are both intuitive Plugins that are somehow free and easy to access. Thus, you can prefer using any of these Plugins to backup your site and bring it highly secure against intruders. Below, we will show you the complete directions of using them one by one. Take a brief look at once only:
Steps To Backup WordPress Site Using BackupBuddy Plugin
Download And Install BackupBuddy
Like any other WordPress Plugins, you also have to install BackupBuddy and activate BackupBuddy. For that, simply, you have to visit your Plugins dashboard and follow the on-screen prompted instructions. Within the last time of interval, such a plugin will be successfully installed.
Configure BackupBuddy
To do so, you need to go through the following course of action:
- First, from the WordPress Dashboard, go to the “Settings” page for the BackupBuddy plugin.
- Now, choose/create a strong password for ImportBuddy.
- Under “General Options,” on the top, you will see a field named “ImportBuddy password.” Now, it’s time to enter that chosen password inside this field. This highly protects your backup files.
- Thereafter, in the “Email Notification Recipients,” you will see the “Error notification recipient(s)” field. You only need to enter an email address where error notifications should be sent.
Set up Offsite Backups
If, in case, for any reason, your server is crashed or not accessible, send a copy of your backup files offsite. BackupBuddy frequently works with DropBox, Amazon S3, other services, and something new called BackupBuddy Stash. While BackupBuddy Stash is actually free built-in secure offsite storage integrated with your BackupBuddy purchase. Thus, choose either Stash or whichever remote destination you like the most. To do this, here’s what to follow:
- From the BackupBuddy menu, search for “Remote Destinations” and put a click on it.
- Thereafter, select the “Add New Destination” option.
- This way you can choose your remote destination and set up the offsite settings for WordPress Backup
Complete Your First Backup
Now your WordPress site is completely ready to run your first backup. Here’s what have to do:
- From the BackupBuddy menu, click the “Backup” tab.
- Next, select the option of “Complete Backup.”
- View seriously in the window as BackupBuddy backs everything up.
- Once everything is backed up by BackupBuddy, you can download the backup file.
- Afterward, send the downloaded file to your remote destination, or you can leave it on the server as well. Our recommendation is to send it to your previously configured remote destination to ensure that the process works.
Schedule Regular Backups
Now come to the last and even the most important step. Scheduling your backups on a daily basis is very useful and constructive. Therefore, schedule regular backups right away. However, BackupBuddy recommends starting with “daily database-only and weekly full backups.” It is always our preference to schedule daily full backups instead of weekly. Weekly might be fine for you only if you don’t change your files on your server very often. You can although choose the weekly option if you’re OK with potentially losing some changes during file restoration.
How To Restore Files From Backup With BackupBuddy?
Restoring the WordPress site’s files directly from backup with the use of the BackupBuddy plugin is simple and less time-consuming. Only, you need to upload the backup file along with a special file called importbuddy.php to your server. Also, you have to verify some basic information by properly checking it out.
Method 3: How To Instantly Backup WordPress Site Using UpdraftPlus Plugin
If you would like to use a robust plugin for WordPress Backup Site, UpdraftPlus is the solid choice. It is one of the few rare free backup Plugins that provide both facilities: backup and restores. Such a free WordPress Backup plugin offers slightly more amazing features which include:
- Perform manual or scheduled backups.
- The efficiency of backup files and databases separately.
- Accumulate backups in DropBox, Amazon S3, and Rackspace.
- Having the ability to split your website into multiple archives.
- Automatically resumes and retries failed upload.
- Straightforwardly restore your website from a backup.
Step-by-step Guide To Backup And Restore WordPress site Via UpdraftPlus
Installing UpdraftPlus
To install it, perform the following steps:
- First and forecast, go to your site’s dashboard.
- Now, click on the “Plugins” tab and then select “Add new”.
- Afterward, Search for UpdraftPlus, and once you get it, click the “Install” tab.
- Once the plugin has been installed successfully, place a single click on the “Activate” tab.
- After doing so, the plugin will give you a brief tour of the settings and options. So, you can modify accordingly to your need.
Backing Up Your WordPress Site
After installation of the UpdraftPlus plugin, you can create a backup of your WordPress website. Here’s how:
- First, from the dashboard, you have to click on the “Settings” tab.
- Thereafter, have to select the “UpdraftPlus Backups” option.
- Now, you have to put a single hit on the blue “Backup Now” button.
- Doing this will allow you to perform your first manual backup.
- However, before pressing the Backup Now button, you can decide whether you want to back up your files, database, or both.
Scheduling Backups
UpdraftPlus enables you to schedule backups. To create your backup schedule, follow the below steps:
- Click on the “Settings” tab under UpdraftPlus.
- Inside the settings section, you can frequently set up a schedule for file backup as well as database backups.
- You can set them to backup at the same time, or set a schedule for the database routine-wise and for files weekly-basis. You can decide it depending on how often you publish new posts or make other changes to your website.
- After successfully setting up the schedule of backup, you need to connect UpdraftPlus to a storage location. To do this, select your storage option, select which files should be included in the backup, and then save the changes. You will thereafter have to follow the prompts that appeared in popup windows to approve the connection. Once the connection is approved, your website will be automatically backed up according to the schedule you have chosen.
Restoring A Backup
Restoring a website using the UpdraftPlus plugin is just like a piece of cake. What you only need to perform is listed underneath:
- Navigate to Settings > UpdraftPlus Backups.
- Under the Backups section, select the “Backup/Restore” tab.
- After clicking on it, a list of all the backups that were previously taken from your website will appear.
- Now, to restore your site, click the “Restore” button. Clarify what to restore: files, database, themes, Plugins, and any other elements of your site.
- Once you select the desired elements, press the “Restore” button.
- The plugin will thereafter start restoring process and at the end allow you to return to your dashboard.
- You can also download the log file in case you want to contact the plugin’s support team for help.
Conclusion
Creating a backup of your WordPress Website is as much indispensable as building a site for your online business. If you really want to make sure your website stays safe and secure, you need to Backup Your WordPress Site. With that, you can easily restore your website and continue doing business as usual. I Hope, the aforementioned guideline has helped you and now you are capable enough to backup your site. But, if still suffering any issues, feel free to contact us. We are adroit tech-geeks who are 24/7 active to lend you an effective hand at your doorstep. Hence, dial the WordPress support number and get united!
Tagged with: backup a wordpress site Backup wordpress how to backup a wordpress site how to backup your wordpress site wordpress backup-
On Time Delivery
- 50
Discount
-
24×7 WordPress Support
-
Cost Effective Services
-
Skills Wordpress Developers
-
100% Satisfaction