
Use the WPML Plugin and Build Multilingual Websites in WordPress
Although the World Wide Web has made the world better connected than before, language issues still prevent businesses from expanding to an international level. Only a website that can be read and understood by speakers of different languages can help you unleash your full potential and tap into a vast audience base. The good news is that WordPress, through its WPML plugin, allows you to create multilingual websites and cater to your target audience worldwide. In this article, you’ll learn the process of creating a multilingual WP website using this plugin.
What Is the WPML Plugin?
The WP multilingual plugin is a solution that provides website owners with all the things necessary to add foreign languages to their site. It also allows them to switch between the languages and translate their WordPress backend. Note that the WPML plugin doesn’t translate your website. It only gives you all the tools to do the task efficiently. Its robust set of features proves to be quite helpful for businesses of all sizes. The subscription for this plugin begins at $29 per year.
The plugin allows you to optimize your website for the search engine in various languages. With it, you have the capacity to arrange languages however you want. You can also translate SEO, meta, titles, and page slugs. It works seamlessly with all popular themes and plugins. As it adheres to the WordPress standards, it’s well aware of what various themes and plugins require to translate. Thus, you can create rich multilingual websites in a hassle-free way.
What’s the Need to Create a Multilingual Site with the WPML Plugin?
WordPress users can use this content management platform in any language. It makes it easy for users to make a website in any language of their preference. There are many plugins and themes in WordPress which are translation-ready. So, people speaking various languages can begin a WordPress website.
But WordPress supports only a single language by default at a single time. It can present a problem for users or businesses wanting to utilize numerous languages to tap into a global customer base. Not only them, but even other institutes like educational and governmental ones also need to make their website available in numerous languages.
One method to provide the option of many languages is the installation of a WordPress subdomain for every language. But it can be complicated as the user needs to handle updates and also the backup of all the installations. The WordPress multilingual plugin resolves this issue. It facilitates the website to turn multilingual. Users can utilize a single WordPress installation for creating content in multiple languages. Moreover, the plugin has a user-friendly interface to manage translations.
The Steps for Creating a Multilingual Site with the WMPL WordPress Plugin
Before beginning to create the plugin, remember to back up your WP site. Whenever you add any new feature to your site, its important to back up to prevent any data loss. Follow the steps below to create this plugin on your WP website.
1. Installation and activation of the multilingual plugin
When you buy a subscription for this plugin, you’ll receive a download link in the Zip file format. Navigate to your WordPress dashboard and follow the steps listed.
- Go to ‘Plugins.’ From there, choose ‘Add New.’
- Now, select ‘Upload Plugin’ and find the ‘WMPL’ file on your device.
- Tap ‘Install Now.’
After the procedure gets finished, select the option of ‘Activate.’ You have successfully activated the plugin.
2. Find the languages of your website
After you have installed the plugin, you’ll find a new WPML tab on the dashboard. You need to do the following to find your site’s languages.
- Go to ‘WPML’ and then select ‘Languages.’ The plugin will prompt you to confirm the site’s existing language before going ahead.
- Tap ‘Next.’ You’ll be asked to select your website’s new languages. This you have to do by checking the related boxes. You can find numerous languages. So, it’s better to spend sufficient time and check the relevant boxes.
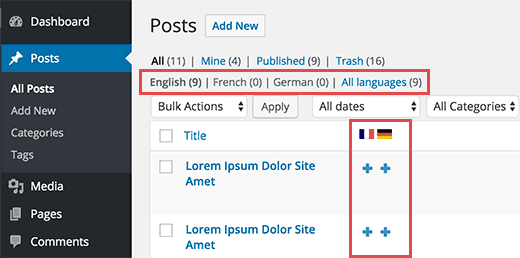
The next part is adding the functionality of ‘Language Switcher’ to your website. It will allow the visitors to select from the range of options you have given them.
3. The process to set the feature of the language switcher
The next part of creating a multilingual WordPress site is to set up the functionality of the language switcher. Language switcher refers to a tool with which the visitors engage to alternate between the various languages that are available on a website. You can see this tool in a dropdown list form, a widget or in the form of a collection of flags. After you pick the new languages of your site, you’ll get prompted to include a switcher to it. Follow the steps below.
- The ‘Widget Area’ is the initial option you’ll view. So, you need to enable it.
- Now you need to set the style for your language switcher. Locate the section of ‘Language switcher style’ by scrolling down. You can choose either a plain list or a dropdown menu.
- Now, you can enable the way languages will be seen within your menu.
- After saving all your changes, you are ready for the next step of preparing all your content for translation.
4. Preparing the content for translation
As mentioned before, this WordPress multilingual plugin will not automatically translate the content in your website for you. You will have to do this work by yourself or outsource it. On selecting the ‘Edit’ option for any pages on your site, you’ll notice another meta box beside the WordPress editor. At this point, you can set the major language for your content. Then you can choose if you desire to set it as the translation of a different page. You can create a fresh page, choose a language and mark it as the translation language of your website’s home page.
If a visitor alternates between languages on the home page, they will arrive at the web page you have recently made. You can also add specific languages to your web pages. It will trigger this plugin to make their copies. As a result, you can protect their structure and restrict your modifications to translating the content of those pages.
5. Add translations for Tags and Categories
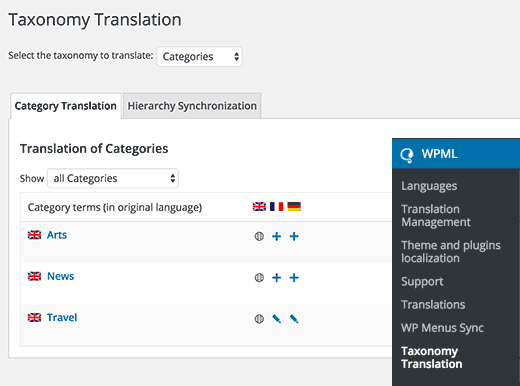
Through the WordPress multilingual plugin, you can effortlessly translate tags, categories, and other custom taxonomy you might be utilizing. Just go to ‘WPML’ and then choose ‘Taxonomy Translation.’ Now, load all those custom taxonomies you desire to translate. Tap on the ‘Add’ beside the taxonomy term to incorporate the translation.
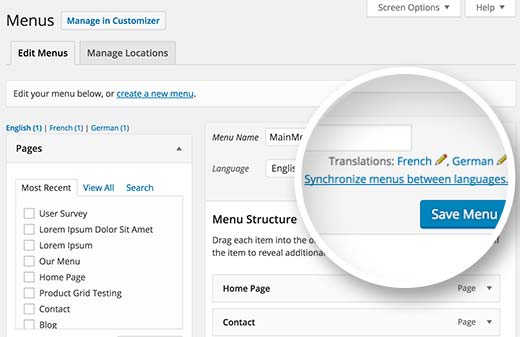
The navigation menu system of WP is quite functional. To translate navigation menus, go to ‘Appearance’ and then on the ‘Menus’ page on the website. In case your site has more than a single menu, choose the one you wish to translate. You can view your menu in the right-hand column. It will have links that can be used to translate into different languages that you have enabled on the website.
Tapping on a particular language will lead to the creation of a new menu for that specific language. You should add the same menu items present – in the menu of your primary language. In case you have pages and posts in navigation menus, then you must translate them. Once you translate them, you can add them from the tabs in the edit menu screens.
7. Translate Themes, Plugins, and Text with WPML
For creating a multilingual WordPress site, you can also translate themes, plugins, and similar text. The WPML multilingual content management system enables the users to select between official translations of plugins and themes. They can also use its string translator. Follow these steps for it.
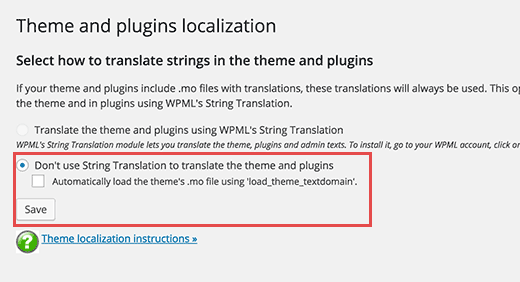
- Navigate to ‘WPML’ and from there go to the page of ‘Themes and plugins localization.’
- You will notice that the option of ‘Don’t use string translation to translate theme and plugins’ is checked by default. Underneath it, you will notice another checkbox. It is for automatically loading the theme’s .mo file through the ‘load_theme_textdomain.’
- Check this box and see if there are translation files present for your specific theme. But note that this functions only with those themes you have downloaded from the directorywordpress.org.
This setting won’t work appropriately for a majority of websites. Many WordPress themes and websites don’t have any translations available. In certain instances, translations may be there, but they are incomplete. So, you should use WPML’s String Translation module to translate your plugins and themes for your website correctly. The module will enable you to translate widgets, custom fields, widgets, and other translatable fields that WordPress generates.
8. Final Words
Now you know how to create a WordPress multilingual website using the WPML. With it, you can easily translate custom fields, menus, taxonomy, post types, and even text into your website. Just select ‘Languages’ and begin translating content. If you find any issues in using the plugin on your site, contact WordPress support. The expert team will resolve all your concerns about your WordPress website.
Read Also:
- Best WordPress Security Plugins
- Best WordPress Popup Plugins
- Best Visual Composer Editor Plugin
- Best WordPress Video Gallery Plugin
- Best WordPress live chat plugin
- Best WooCommerce Plugins
- Best WordPress theme customization plugins
-
On Time Delivery
- 50
Discount
-
24×7 WordPress Support
-
Cost Effective Services
-
Skills Wordpress Developers
-
100% Satisfaction